
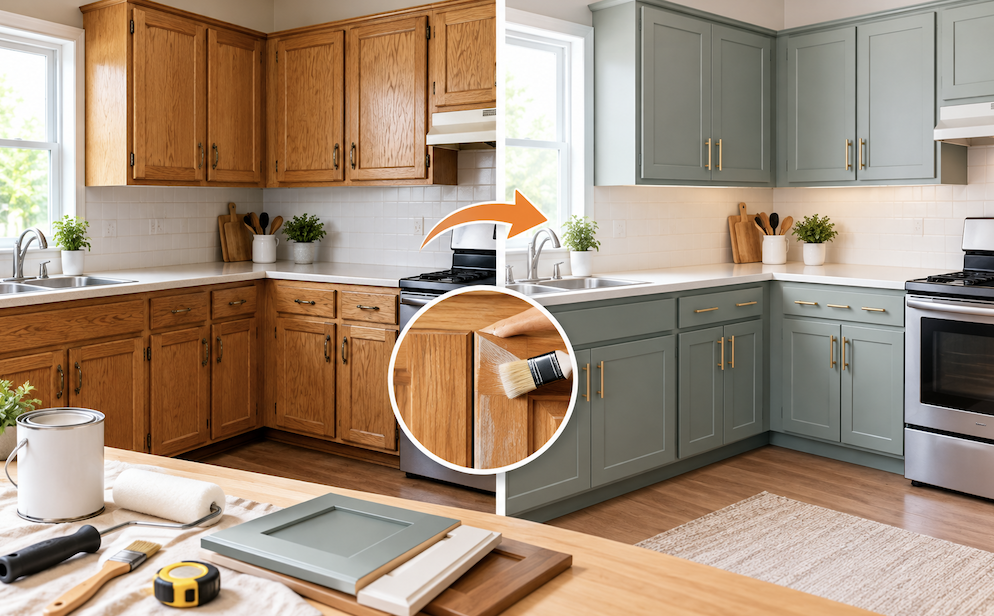
Full cabinet replacement is one of the most expensive parts of a kitchen renovation, but structurally sound cabinets often don’t need replacing at all to achieve an updated look. This guide covers the range of approaches that can transform a kitchen’s appearance while keeping the existing cabinet boxes in place.
Why Full Replacement Isn’t Always Necessary
Cabinet boxes, the structural frames behind the visible doors and drawer fronts, often remain perfectly functional for decades even as the visible finish becomes dated. If the boxes themselves are square, sturdy, and free of water damage, the outdated appearance can almost always be addressed through refacing, painting, or targeted updates at a fraction of full replacement cost, making a full teardown unnecessary for the majority of kitchens with structurally sound existing cabinetry.
Assessing Cabinet Box Condition First
Before choosing an approach, checking cabinet boxes for water damage, particularly around the sink and dishwasher, swelling in particleboard construction, and overall structural soundness determines whether refacing or painting is viable, or whether the underlying damage means full replacement is actually the more sensible path despite the higher cost discussed throughout this guide.
Cabinet Refacing
Cabinet refacing involves replacing cabinet doors and drawer fronts entirely while applying a matching veneer to the visible cabinet box surfaces, achieving a fully new appearance while keeping the underlying structure completely intact. This approach typically costs considerably less than full replacement while still delivering a comprehensive visual transformation, making it a strong middle-ground option for anyone wanting a substantial change without the cost and disruption of full demolition and replacement.
Choosing the Right Paint Sheen for Cabinets
Similar to the paint finish guidance discussed in the earlier living room paint color guide, a satin or semi-gloss finish holds up better to the frequent cleaning and handling kitchen cabinets receive than a flat or matte finish, which shows fingerprints and wear more readily in this high-touch application specifically.
Painting Cabinets: A Step-by-Step Overview
Painting existing cabinets, whether wood, laminate with proper preparation, or previously painted surfaces, starts with thoroughly cleaning and deglossing the surface, followed by sanding to create a surface the new paint can properly adhere to. Applying a quality bonding primer specifically formulated for cabinets, then two thin, even coats of a durable cabinet-specific paint, produces a considerably more professional, long-lasting result than using general-purpose wall paint, which isn’t formulated to withstand the frequent handling and cleaning cabinets receive.
Removing Doors for Easier, More Even Painting
Removing cabinet doors and drawer fronts entirely to paint them flat on a horizontal surface, rather than attempting to paint them while still hanging vertically in place, produces a noticeably smoother, more even finish free of drips, while also making it easier to fully coat all edges consistently.
Choosing Between Staining and Painting
For cabinets with attractive existing wood grain, restaining to a different, more current wood tone preserves and highlights that natural texture rather than covering it entirely, appealing to anyone wanting an updated look while keeping a traditional wood aesthetic. Painting works better for cabinets with less desirable existing wood grain, water damage marks, or for anyone wanting a more dramatic style shift toward a modern, solid-color aesthetic that current kitchen trends increasingly favor.
Sourcing Matching Replacement Doors
When ordering replacement doors only, discussed earlier, working with a supplier that can match exact existing hinge boring patterns, not just outer dimensions, avoids a mismatch that would otherwise require re-drilling cabinet boxes to accommodate new hardware, adding unexpected complexity and cost to what should be a relatively straightforward door-swap project.
Replacing Cabinet Doors Only
For cabinet boxes in good condition where only the doors themselves look dated or damaged, replacing just the doors and drawer fronts while keeping the existing boxes provides a meaningful style update at a lower cost than full refacing, provided new doors can be ordered to match existing box dimensions accurately, which most cabinet door specialty suppliers can accommodate with proper measurements.
Considering Cabinet Handles vs Knobs
Beyond finish, choosing between handles and knobs affects both appearance and daily usability, with longer handles generally offering easier grip for larger upper cabinets and drawers, while knobs suit smaller doors and offer a more traditional appearance, making this a functional as well as aesthetic decision worth considering alongside the finish coordination discussed earlier.
Updating Cabinet Hardware
As mentioned in earlier home organization guides, swapping outdated cabinet hardware is one of the fastest, most affordable ways to meaningfully change a kitchen’s appearance, and pairing new hardware with a fresh coat of paint amplifies this effect considerably beyond either change made in isolation. Choosing a hardware finish that coordinates with other kitchen fixtures, like faucet and light fixture finishes, creates a more cohesive, intentional overall look.
Considering a Two-Tone Cabinet Approach
Painting upper and lower cabinets in two complementary but distinct colors has become a popular way to add visual interest without committing to a single uniform color throughout, offering a middle ground between an entirely monochromatic kitchen and a busier multi-color scheme that could feel overwhelming in a smaller space.
Adding Glass Panel Inserts
For upper cabinets, replacing solid door panels with glass inserts, either clear, frosted, or seeded glass, adds visual interest and can make a kitchen feel more open, particularly effective for a small number of cabinets used to display attractive dishware rather than applied throughout the entire kitchen, which can feel overwhelming and require more consistent internal organization than fully enclosed cabinets demand.
Converting Select Cabinets to Open Shelving
Removing doors from a small number of upper cabinets and finishing the interior attractively creates open shelving that adds visual variety to an otherwise uniform wall of cabinetry, similar in spirit to the small-space storage principles discussed in earlier guides, though this works best applied selectively rather than throughout an entire kitchen, since open shelving requires more consistent tidiness than concealed storage.
Adding Under-Cabinet Lighting
As discussed in the earlier home lighting guides, under-cabinet lighting meaningfully improves both functionality and the overall sense of a kitchen being updated, since it’s a relatively modern feature that older kitchens often lack entirely. Battery-powered or plug-in options avoid any electrical work, while hardwired options, requiring an electrician, offer a more permanent, polished result without visible battery compartments or cords.
Considering a Pantry Cabinet Update Alongside Main Cabinetry
A pantry cabinet, if present, is easy to overlook during a broader cabinet update project, but applying the same paint, hardware, and organizational improvements discussed throughout this guide to the pantry as well keeps the overall kitchen looking cohesively updated rather than leaving one visible cabinet obviously outdated compared to the rest.
Updating Cabinet Interiors With Organizers
Even without changing a cabinet’s exterior appearance, adding pull-out shelves, drawer dividers, or a lazy Susan for corner cabinets meaningfully improves daily functionality, addressing the practical frustration of dated cabinet interiors even when paired with an otherwise unchanged exterior appearance, similar to the interior organization improvements discussed in earlier closet guides.
Adding Crown Molding for a Finished Look
Cabinets that stop short of the ceiling, leaving an awkward gap, can look more intentional and finished with crown molding added along the top, bridging the visual gap between cabinets and ceiling in a way that makes even original, unpainted cabinets look more considered and polished than the bare gap alone.
Considering a Backsplash Update Alongside Cabinets
Since backsplash and cabinets sit in close visual proximity, revisiting the backsplash material guidance from the earlier kitchen backsplash guide at the same time as a cabinet update, even if the backsplash itself isn’t being replaced, helps confirm the two elements will look intentionally coordinated once the cabinet update is complete rather than assessing them as entirely separate decisions.
Coordinating Countertops With Updated Cabinets
If a countertop replacement is also part of the project, choosing a countertop material and color that complements the newly updated cabinet finish, rather than treating the two decisions independently, ensures the overall kitchen reads as a cohesive update rather than mismatched individual changes.
For budgets not extending to a countertop replacement, ensuring new cabinet colors and finishes work reasonably well with existing countertops avoids an updated cabinet look that clashes with an unchanged counter surface.
Planning Around Appliance Replacement Timing
If new appliances are also planned within the next few years, considering their likely finish and style when choosing a cabinet color and hardware now avoids a mismatch once appliances are eventually updated, similar to the forward-planning approach recommended for other coordinated kitchen decisions throughout this guide.
Comparing Cost: Refacing vs Full Replacement
Refacing typically costs a meaningful fraction of full cabinet replacement while delivering much of the same visual transformation, making it a strong value option for kitchens with sound existing cabinet boxes. Full replacement becomes more justified when cabinet boxes themselves have structural issues, water damage, or when a kitchen layout change is also desired, since refacing can’t address layout or configuration changes the way full replacement can.
DIY vs Hiring a Professional
Painting cabinets and updating hardware are reasonable DIY projects for patient homeowners willing to follow proper preparation steps carefully, since rushed prep work is the most common cause of disappointing DIY paint results. Refacing, door replacement requiring precise measurement, and any electrical work for lighting are worth hiring professionals for, both for a more polished result and to avoid costly measurement errors in custom door ordering.
Setting Realistic Timeline Expectations
A DIY cabinet painting project typically takes a full weekend to a week depending on kitchen size and the number of coats required, with kitchen access significantly limited during this period. Professional refacing typically completes within a few days to a week, making it worth planning around reduced kitchen functionality during the project regardless of which specific approach is chosen.
Preparing for Temporary Kitchen Disruption
Regardless of which update approach is chosen, setting up a temporary kitchen area, even just a folding table with a microwave and electric kettle in another room, makes the disruption period considerably more manageable, particularly for a family relying on daily kitchen access throughout the project timeline discussed above.
Common Cabinet Update Mistakes
Skipping proper surface preparation before painting, particularly deglossing and sanding, is the most common cause of paint peeling or chipping prematurely on a DIY cabinet painting project. Choosing new hardware or door styles without considering the kitchen’s overall existing style and other fixtures is another common mistake that results in an update that feels visually disjointed rather than cohesive.
Considering Cabinet Updates for Rental Properties
For rental property owners, cabinet painting and hardware updates offer a particularly strong return relative to cost, since tenants and prospective renters respond noticeably to a kitchen’s visual freshness even when the underlying cabinet boxes are original and dated, making this one of the more cost-effective updates for improving a rental unit’s appeal between tenancies.
Considering Resale Value Impact
Updated cabinets, whether through refacing, painting, or a full replacement, consistently rank among the kitchen features buyers notice and value most, making this one of the more valuable pre-sale improvements a homeowner can make, particularly the more budget-friendly refacing and painting approaches that deliver strong visual impact relative to their cost.
Maintaining Updated Cabinets Long-Term
Once cabinets are updated, wiping down painted surfaces with a gentle, non-abrasive cleaner rather than harsh degreasers, and promptly addressing any chips or scratches with matching touch-up paint kept on hand specifically for this purpose, keeps a freshly updated look intact for considerably longer than neglecting minor damage until it accumulates into a more noticeable, harder-to-fix issue.
A Final Word on Pacing the Project
For anyone tackling a cabinet update as a DIY project, breaking the work into stages, one section of cabinets at a time rather than the entire kitchen simultaneously, keeps the kitchen at least partially functional throughout the process and makes the overall project feel less overwhelming than attempting every cabinet at once over a single, intensive weekend.
A Note on Choosing Trending Colors Thoughtfully
While current trending cabinet colors can offer helpful inspiration, choosing a shade purely because it’s popular at the moment, without considering how it will age alongside the rest of a kitchen’s more permanent fixtures like flooring and countertops, risks a cabinet update that feels dated again sooner than a more timeless, versatile color choice would.
Final Practical Tip: Testing Paint Samples First
Similar to the paint testing guidance from the earlier living room color guide, testing a cabinet paint color on an inconspicuous cabinet interior surface or a spare piece of matching material before committing to painting every visible cabinet avoids discovering an unexpected undertone or sheen issue only after a large portion of the project is already complete.
Conclusion
Full cabinet replacement is rarely necessary for cabinets with sound structural boxes, and approaches like refacing, painting, and targeted hardware and lighting updates deliver much of the same visual transformation at a considerably lower cost and shorter timeline. Starting with the least invasive, most affordable option and assessing whether it meets your goals before committing to a more extensive approach is a reasonable strategy for most kitchens.